Monday, May 30, 2016

Glaucus Completed

In spite of all the Memorial Day festivities, I was able to complete the custom order for one of my Glaucus knives.  This one turned out really classy, if I do say so myself.  Here are the final progress photos and some higher quality finished shots.

The knife is practically finished at this point.  The only thing left to do, aside from a little tweaking on the pivot assembly, is to texture the 416 stainless scales.  The client requested a simple design similar to the Pride knife found on my Knife Gallery page; a simple stripe sweeping across the scales.  Here is the design drawn on with permanent marker.

Here are the two scales after they have been carved and filed down using files, a rotary tool, and some hand sanding.

For added contrast I decided to mirror polish the center stripe, so additional hand sanding and some buffing were in order.

With a diamond flame bit in my rotary tool, I stippled the scales to give it some texture.  I really like the way they turned out.

As a finishing touch, the exterior screws get a spin on the buffer to give the heads a mirror polish.  This little jig holds the screw securely so I can buff it safely.  Once this step was done, it was on to final assembly.

My photography skills are still a work in progress.  Besides the fact that there is a big fingerprint right on the mirror surface of the stripe, the photos aren't too bad.  This photo shows off all the different textures: the satin-finished blade, mirror-polished stripe, and textured scales and thumb stud.  You can even see some of the jeweling on the insides of the liners in this shot.

The spine view shows the textured liners that have been anodized a nice rose color to break up the silver surface and give it some interest.

Here is the back side of the knife in the closed position.  Looks just as good on this side as on the front.

This photo shows the alignment of the blade.  Centers up perfectly!

This last pic shows a nice early lockup  The face of the lock is carbidized, which takes away all of the stickiness that titanium locks can have.

I'm extremely pleased with the final outcome of this knife.  The full stainless scales with all the carving and texturing was a challenge, but in the end, it turned out great.  It was a fun project and the looks of the piece are quite unique.  I sure hope its new owner likes it and enjoys using it as much as I did making it.  Thanks for following along with me on this build.  Now, back to my daughter's chef knife set.

-  Brandant Robinson

Monday, May 23, 2016

Custom Glaucus Build

I guess my timing for taking custom orders was spot on since I received my first order request just two days after opening the books.  So far, this has been a great experience.  I've had fun working with the client to nail down all the specifications and design of this new knife.  I hope to deliver a piece that meets all of the clients expectations.  I invite everyone to tag along with me on this new knife-making adventure.

I made some serious progress on this knife over the last week.  Somehow, I found a lot more time than usual to sneak off to my little shop and smell the glorious aroma of hot metal.  The design that the client and I settled on was a Glaucus pattern with solid 416ss scales that will be carved and textured, similar to the Pride that can be found on the Knife Gallery page.  Here are a series of photos showing the build so far.

The first step of the build was to profile the blade and get it ready for heat treatment.  The process of heat treating takes some time, so I like to get the blade going from the start.  Here is the CPM154 blade after it has been profile ground, pivot and thumb stud holes drilled, and the choil filed in.  The flat surfaces have also been ground down to 600 grit.  All of this work is much easier to accomplish while the steel is in its annealed state.

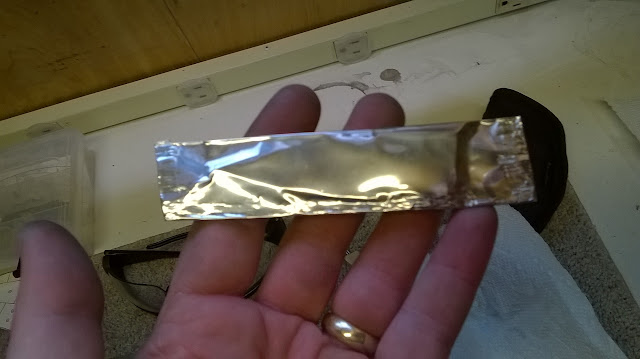
After the blade is ready to go, it gets wrapped in stainless steel foil and enters into the heat treat process.  Heat treating is accomplished in four steps.  First the blade is heated above its critical temperature, which for this steel is around 1850 degrees F.  After soaking at this temperature the blade is removed and quenched between two aluminum plates to quickly draw out the heat, leaving the steel in a hardened state.  Next, the blade goes into a super cool or cryogenic process which hardens the steel even more.  Lastly, the blade goes through two temper cycles to draw out some of the hardness from the steel to make it tough and more usable without being brittle.

Here are the raw materials for the major parts of the knife handle.  The liners will be made from 6AL4V titanium and the spacer and scales will be from 416 stainless.

Here are the parts after they have been profile ground to shape.  I know it doesn't look very exciting now, but just wait.  It gets better.

After a whole lot of drilling, tapping, grinding and fitting, here are the knife parts ready for their initial assembly and first fitting.  The small parts at the top of the photo will make up the pivot assembly.  It is comprised of a pivot pin with two button-head screws, two phosphor bronze washers, and a pivot bushing.  All the pivot parts have been precisely ground to length and fit to the blade.

All the parts have been assembled for the first time and are ready to be profile ground so that all parts fit together seamlessly.  It's actually starting to look like a knife now.

After some time on the grinder with the slack belt attachment, the surface of the handle scales get rounded over and polished up to 600 grit.  With all the sharp edges knocked off, the knife feels really comfortable in the hand.  From here on the scales will be carved and textured to the design that the client and I agreed on.  The design will be a carbon copy of the Pride knife shown on the Knife Gallery Page.

Here's a quick look at the spine of the knife.  We decided to keep everything sleek and smooth with no filework.  The liners will get a very fine texture along the edges to break up the looks of the surface, simply for aesthetics.

Moving on now to the blade.  This photo shows the blade after it has been hollow ground to its finished form.  I use a shop-built file guide to keep the plunge lines perfectly symmetrical and a 6 inch contact wheel for a deep hollow grind.

Next, the blade gets its final finish, a hand-rubbed satin finish.  This kind of finish is so beautiful.  At least it is to my eyes.  The finish is uniform and and smooth with all stray scratches are sanded out.  This takes a lot of work, which is likely why many knife makers are satisfied with a belt finish right off of the grinder.  I like to go the extra mile on my blades.

This photo shows the right liner after the lock bar has been cut out.  The lock bar is the part that will engage with the back edge of the tang to keep the blade locked open while in use.  This is cut into the liner using a small cutting disc mounted in my drill press.  I didn't take any pics of this step, but you can scroll back through previous posts if your interested.

Here are the liners in their almost-finished state.  The ceramic detent ball has been pressed into the lock bar and the inside surfaces have been given a jeweled finish.  The jeweled finish is accomplished at the drill press with a Cratex rod that has an abrasive embedded in the rubber cylinder.  This detail is very subtle, especially since it is actually inside the knife, but I think it's worth the extra work.

The edges of the liners have been stippled using a rotary tool with a diamond flame bit.  This gives the liners a fine texture to them that will eventually match the texture on the scales once they have been finished.

The next step is to build the thumb stud.  I use a piece of 416ss dowel rod and turn the stud on my mini lathe using files and sandpaper to establish the design.  The stud gets drilled and tapped to accept a screw which will fasten it onto the blade securely.

Here is the knife in its current state.  It's practically done except for the carving and texturing yet to accomplish on the scales.  I also need to tweak the pivot system until it is velvety smooth.  You can see that my maker's mark has been etched into the blade and the face of the thumb stud has been stippled to match the texture on the liners.  It's looking pretty darn good if you ask me.  I do need to put this little knife on a diet though.  Being an all-steel knife, it's a little on the heavy side.  I'll lighten the load by removing some material from the inside of the scales and I'll also drill some holes through the spacer to remove any extra material and lighten things up some.

Here is a spine view of the knife.  One thing I just realized that I neglected to document was the anodization of the liners.  They have been colored this nice rosy pink hue, since the new owner is of the feminine persuasion.  It actually looks really nice and that thin strips of color help break up the silver surface.  Classy!

The next big step is to carve and texture the scales.  It's a meticulous process that can get a little fussy and make one's eyes go crossed, but I'm looking forward to the challenge.  Wish me luck.  I hope the client will like her new knife.  I know that I sure do.  Thanks for following along with me on this build and we'll catch you next week.

-  Brandant Robinson

Monday, May 16, 2016

Daughter's Chef Set

Well, my oldest daughter graduates high school in a couple of weeks.  I promised her a small set of kitchen knives as a reward for some of the accomplishments that she has achieved in her young life.  I figure it's time to make good on my promise.  I know I won't finish up the project before graduation, but maybe it will work as a post graduation gift.  At least she'll have it before she moves out on her own.

The set will include four knifes: a chef knife, boning knife, small utility knife, and a paring knife.  Here are a few photos to show the progress so far.

The four blanks cut out of 440C steel and profile ground.  440C is a classic steel and it works great for kitchen knives since it is very stain resistant and holds a great edge.  As you all know, I'm a folder guy.  I've made a few full tang knives in the past, and I look forward to the challenge of finishing these knives out.

Here are the knives after all the pin holes have been drilled to accept 3/32" pins.  I have also drilled multiple holes through the tangs to reduce the weight and balance out the finished knives.

To further reduce the weight of the tangs and to give them that look of custom made knives, I taper each tang.  Each gets ground down to a taper of about 1/3 the overall width at the end of the tang.

Before I knocked off for the weekend I was able to get the initial grinds done on the paring and boning knives.  The paring knife went fine, but the boning knife took a little more attention as it's long and has a pronounced curve to the cutting edge.  Now, two more knives to grind and polish out a little bit and then it will be time to heat treat.

I really do like making full tang knives.  They come together so much faster than a folder.  It's really a breath of fresh air not having to worry so much about precise dimensions and fitting pivot systems.  I hope my daughter will like her chef set.  I plan on making a suitable base for these knives as well to show them off right.

Thanks for following along with me on this new adventure.

-  Brandant Robinson

Friday, May 13, 2016

Now Accepting Custom Knife Orders!

I've come to the point in my knife-making adventures that I'm ready to start taking orders for my handmade custom knives.  I have added a new page to my blog entitled, "Custom Orders."  Pretty original, huh?  If you are interested in my work and would like to collaborate with me for your next custom knife purchase, jump over there to find out how to go about it.  If you have any questions, simply scroll to the bottom of this page and use the "Contact Brandant" box or shoot me an email at theoldstump@live.com and I'll get back with you.  Thanks for your support and for following along with me on my knife-making adventures.

-  Brandant Robinson

Monday, May 9, 2016

Cronus - Finished Pics

Yard work kept me out of the shop again this last week, but I did manage to take a few finished photos of the Cronus knife.  I'm certainly not satisfied with my photography skills, but I think I may have some ideas of how to make the next ones better.  I'd be grateful for any pointers from you photographers out there.


If you're interested in adding this knife to your collection, you'll find it listed on the "Available Knives" page here on my blog.  Thanks for your interest in my work.

-  Brandant Robinson

Monday, May 2, 2016

Finishing up the Cronus Knife

Between all of the yard work and spring cleaning, my shop time has been in short supply.  It rained all day Saturday, so that put the yard work on hold and drove me indoors.  Since I couldn't get done what needed to be done outside, I took the opportunity to work on the Cronus knife.  In fact, I was able to get the knife completed.  Here are a few pics of the last few steps of this build.

The photo shows the completed blade.  I branded it with my maker's mark and put the finished edge on.  Believe me when I say, it's sharp!

I chose to anodize the liners this nice, sky blue color.  I thought it would compliment the red tones of the bone scales.  The process of anodizing titanium still fascinates me.  It's like painting with electricity.  Anyways, I think they look good.  I also carbidized the lock face to improve lock up and eliminate any potential "stickiness" in the lock.

Here is the knife all finished up and assembled for the last time.  I didn't get a pic of the knife with the thumb stud installed, but I'll get some higher res photos taken in the next few days to really show this knife off.  In my post-build evaluation of this knife, I found that I am very pleased with the overall look.  It's something a little different than my usual pieces and I think that's why I like it so much.  I'll get this one added to the "Available Knives" page as soon as I get some photos taken.  As always, my email subscribers will get a message as soon as it's available.  If you're not on my list, send me an email at theoldstump@live.com or use the "Contact Brandant" box at the bottom of this page and I'll add you in.

My next project will be a fairly large undertaking for me and a step outside my comfort zone.  My sweet daughter is graduating high school and will likely be moving out on her own soon.  I have promised her a kitchen knife set for some time now and it's about time I make good on my commitment.  It will be a four knife set including a chef's knife, boning knife, smaller utility knife and a paring knife.  I have a big plate of 440C for the blades, some 1/4" thick 416 stainless for bolsters, and a nice block of box elder burl for the scales.  I've made a couple kitchen knives in the past for my sweet wife, so it's not something brand new, but building folders is where I'm most comfortable.  I plan to go all out with tapered tangs and dovetailed bolsters.  I might even try some flat grinds on the blades.  I'll have to make that decision soon.  This should be a fun and challenging adventure.  I hope you will follow along with me.  Thanks for stopping by the Robinson Edge.

-  Brandant Robinson