Monday, February 1, 2016

Almost There

This weekend was very productive in my knife shop.  I was able to almost get the second Glaucus knife finished.  If only I had had just a couple more hours . . .

Here's the blade after several hours of hand sanding.  The 600 grit finish turned out quite nicely.  I thought about a mirror finish on this blade, but it just didn't look right, so I went to my old standby of a hand-rubbed satin finish.  In my eyes, this is a much better finish.

Here is the left side of the handle.  If you look closely at the bottom where the bolster and scale meet, you will see that the thumb notch has been ground out to allow for the lock to be released with one hand.  Here's another big confession moment.  That makes two with this knife.  Ouch!  I was hurrying too much and actually ground off the wrong scale.  So, that forced me to remake an entire liner.  What a pain!  That's the second piece I've had to remake for this little knife.  I guess I can call this a break-even knife.  Anyway, with the new liner in place, everything was back on track.

Time to work on the lock. To begin with, the area of the lock gets blacked out with a permanent marker.  I attach the spacer and the pivot/blade mechanism and scratch a line along the back of the tang where the lock will make contact with the blade.  I also scratch a line along the length of the lock to guide me as I cut it out.

This photo shows the lock after it has been cut out.  I do this with a small cutoff wheel mounted on a mandrel which is chucked up in my drill press.  The liner is held in my drill press vise and I manually feed it into the cutoff wheel for a nice, smooth cut.  Works great.

The liners get a jeweled finish on the inside surfaces.  The picture looks a little blue, but they are really natural titanium and have not been anodized yet.

After filing the lock face down to where it mates up with the blade tang correctly, I drill and install the detent ball.  This detent ball that I used on this one is ceramic.  It really makes a difference in how smoothly the blade opens.  It's definitely worth the little extra cash for the ceramic over stainless steel.  Plus, it doesn't give me any problems during the anodization process like stainless steel does.

The majority of my shop time this weekend was eaten up in fileworking the spacer and liners.  The spacer got my favorite "twisted ribbon" pattern and the liners got a serpentine pattern.  These two patterns look really great against each other.  The liners have also been anodized a bronze color that looks fantastic against the creamy mammoth scales.

Here is the blade after my mark has been etched into the side.  I'm quite proud of my new mark.  It looks pretty fancy.

This is where I left off for the week.  You can probably see that I decided to put a satin finish on the bolsters.  The mirror polish looked nice, but mirror finishes show scratched way too easily and a knife made to use will get scratched.  Satin finishes look much better for much longer.  The knife is very near completion.  It needs a little bit of fine tuning on the pivot to make it silky smooth.  I also need to make a thumb stud and put an edge on the blade to finish everything up.

Here's a view of the spine.  It's a little out of focus, but you can kind of see how great the bronze-colored liners look against the scales.  Very nice!

This knife should be finished up this next week without too much trouble.  I'll take some good pics and also send out an email to my email subscribers when it's done and available for purchase.  If you're not on my list, just send me an email at theoldstump@live.com with "Subscribe" in the subject line and I'll add you in.  Thanks for following along with me on this knife-making adventure.

-  Brandant Robinson

Monday, January 25, 2016

Progress on Glaucus #2

I made some pretty good progress on the second Glaucus knife over the weekend.  I had some triumphs and some setbacks, but in the end, things are working out just fine for this build.  I didn't take a lot of photos since there was nothing to see that I haven't shown many times before.

Since I already had the handle all assembled, I decided to start with shaping the bolsters and scales.  As I mentioned last week, I was worried that I could lose much of the bark from the mammoth scales during shaping since I didn't thin them enough in the beginning.  My fears were realized as I shaped the handle and lost literally all of the bark.  Oh well, you live and learn I guess.  It wasn't all bad.  The interior ivory was a nice, creamy color that is beautiful in its own right.  I'm still a little disappointed, but I'll get over it.  The photo above shows the handle with a 220 grit finish.

After hand sanding through progressively finer grits of sandpaper and a few minutes on the buffer, here's the final look of the handle.  The ivory polished up beautifully and the bolsters took the mirror finish really well.  I think it looks quite elegant.

With the handle basically done I was able to turn my attention to the blade.  I hollow ground the blade on my 6 inch wheel for a nice, deep grind.  I think I might take this blade up to a full mirror polish to match its shiny handle.  I'll have to make that decision in the near future.

I didn't get any photos of the pivot system being built, but it was done like all of the rest of my knives.  I actually had a little problem with the point of the tang sticking out beyond the bolsters in the closed position.  It just wasn't acceptable that way, so I had to grind the tang back a little so that it nested inside the handle better.  In doing that I had to remake the spacer.  I really hate remaking parts, but I just couldn't let a knife leave my shop with a problem like that.

The above photo shows the progress so far.  I've said it before, but I really like this design and the more that I look at them, the more I'm liking those creamy mammoth ivory scales.  During the next trip to the shop I'll get the blade all polished up and hopefully start file working the spacer and liners.  I do still need to get the lock and detent built in as well.  This should be a nice "Sunday-Go-To-Meeting" type of knife; a true gentleman's folder.  I may even get brave and try my hand at some pyrography on the scales.  I'll have to do a little test run before committing to something like that.  I really don't want to mess this one up.  Thanks for following along with me on this knife-making adventure.

-  Brandant Robinson

Thursday, January 21, 2016

Glaucus #1 Pics

Here are the promised pics of the first Glaucus knife that I promised to show:


I've been carrying this knife for several days now and simply love its size, weight and looks.  A great all around knife.  Sorry folks, this one's mine!!!  Thanks for stopping by.

-  Brandant Robinson

Monday, January 18, 2016

Glaucus #1 Complete

I was able to complete the first Glaucus knife over the weekend and I'm very pleased with the outcome.  The little knife turned out even better than I expected and I really like the overall design and feel of the knife.  It's going to be a great pocket knife.

If you recall where we left off last week, the knife was close to completion.  A little embellishment was all that was lacking.  This little object in my hand is the thumb stud that I turned on my mini wood lathe using files and sandpaper.  Since my phone doesn't take good closeup pics, you'll have to take my word on it until I get out the good camera.

Here is the thumb stud attached to the blade.  Looks right at home.

Now it's time to add some flare and class to this little knife.  Since this one is going to be my own knife, I chose to do my favorite file work patterns.  Maker's prerogative I suppose.  The spacer gets a twisted ribbon pattern as seen above.  The flow of this pattern is really eye catching.

The liners get a climbing vine pattern filed into the edges.  This pattern on such a small scale is really a challenge and I almost went cross eyed doing it.  In the end, it turned out quite nicely.  File work takes a lot of time, but it's always worth the extra effort.

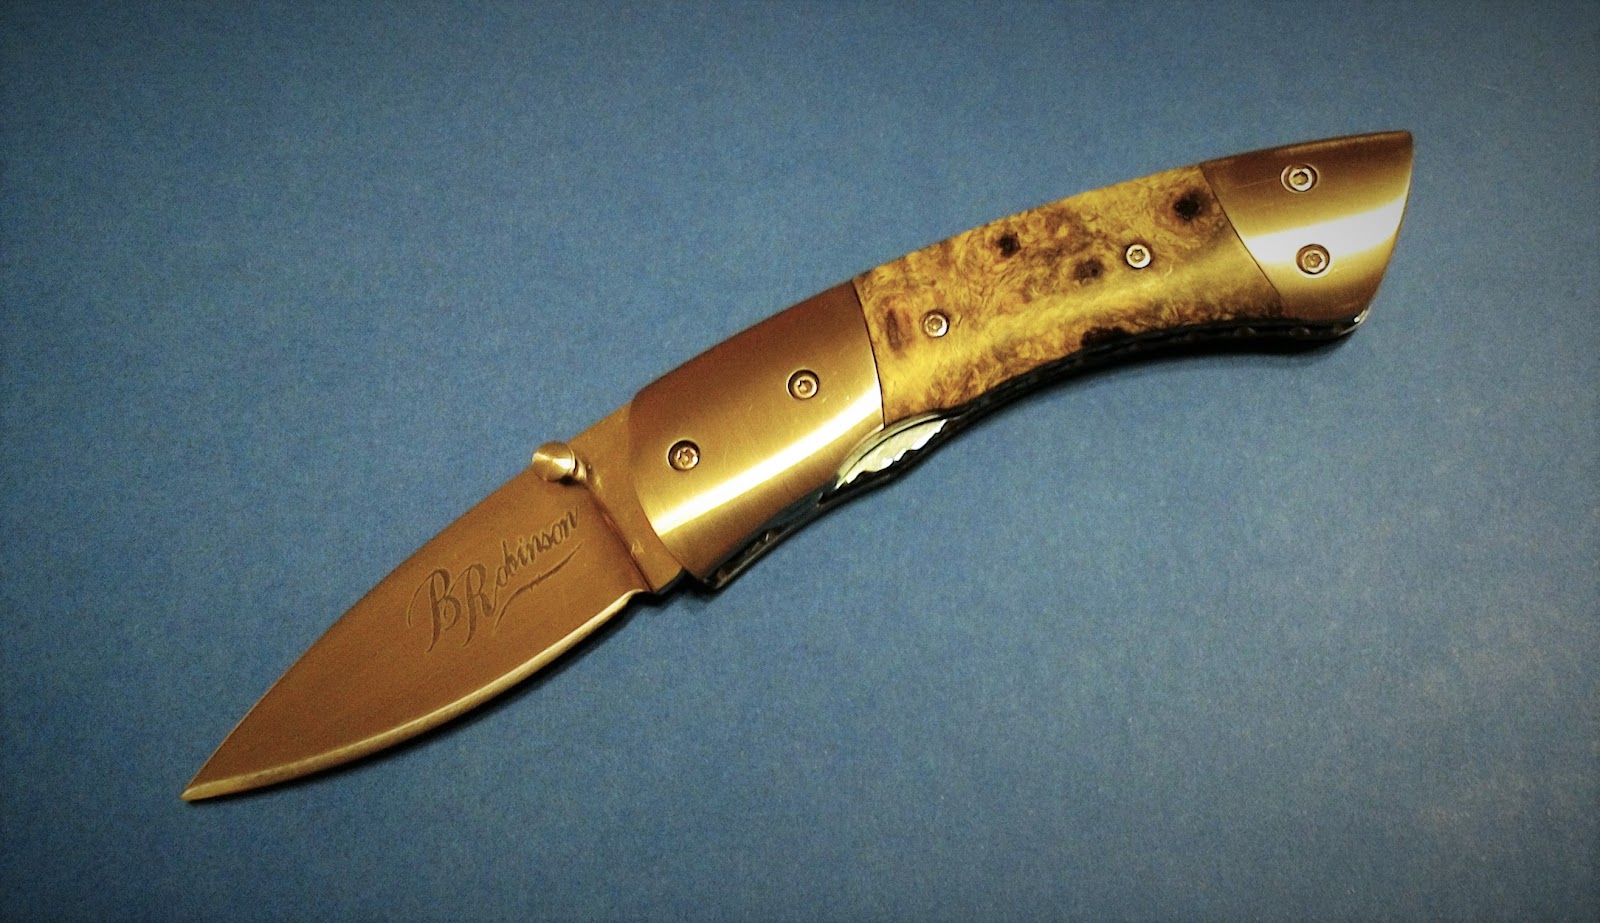
The blade gets etched with my new maker's mark.  The mark is kind of big for this small, two-inch blade, but I still like it.

Here are two quick pics of the finished knife.  Hopefully tonight I can get some shots with the good camera and better lighting, but you can still make out some of the details in these.  I chose an icy-blue color to anodize the liners which compliments the earthy tones of the buckeye burl scales nicely.  I've been carrying this knife for a couple of days now and really like it.  It's the perfect size to get lost in your pocket and be ready for those everyday cutting chores that a good EDC should be able to take care of.  All in all, I'm very please with this knife.  I think this design will turn out to be a very popular one.

Next week we'll continue work on the second Glaucus knife.  I'm a little worried that the mammoth scales as they are will make the handle a little too wide at their current thickness.  I really should have seen this coming before drilling and countersinking for screws.  Sometimes I can just kick myself.  I may end up grinding off some of the thickness which will mean the outer bark of the ivory will be lost.  I'm a little sad about that, but the knife has be be functional first and beautiful second.  I may luck out and find the color of the mammoth to go deep enough into the scales to still be beautiful.  I'll keep my fingers crossed.  If not, they will be a nice creamy color that should still look great.  Check back next week for the next update.  Thanks for stopping by the Robinson Edge.

-  Brandant Robinson

Monday, January 11, 2016

Progress on Glaucus #1

If you've been following along with me on my current builds, you will recall that I started three knives at the same time.  Well, two knives and a straight razor that is.  I finished up the razor and got the two "Glaucus" knives up to the rough assembly stage.  I decided to leave the knife with the mammoth scales alone for a time and focus on finishing up the other.  Working on several knives at a time has its advantages, but I simply like to focus my attention on a single build at a time.  So, with that in mind, here is the progress that I made on the first Glaucus knife.

Last weeks post showed the progress of this knife up through the refinement of the handle.  This pic shows the bolsters and scales after they have been ground up to 600 grit.  It's time for a little hand finishing now.

The bolsters have a nice satin finish now and the buckeye burl scales are ready for a few coats of finish.

I added a couple of scales to the handle of my hand sander to make it a little more comfortable to work with.  It's much better than it was before, but it's still not quite right.  I'll keep modifying until I get it right.  Hand sanding is probably my least favorite task in the build process, so I want to make it a painless as possible.

Here are the scales after a coat or two of tongue oil.  The oil finish really brings out the character in the wood.  This phone pic is a little out of focus, but I think you can see the beauty in the scales coming out.  I'll apply a few more coats of oil and finish off with a paste wax once the oil is completely dry.

This photo shows the blade with a 600 grit hand finish.  I really like the soft look of a good satin finish, otherwise I wouldn't go through all the work it takes to get there.  It's ready for my maker's mark, thumb stud, and a sharpened edge, but that will come a little later on.  The right liner has been blacked out with a marker and the lock outline scratched in with a razor blade.

I didn't take any photos of cutting or fitting the lock, but it was done the same way as all my other liner lock knives.  I also didn't get any photos of installing the detent ball or the corresponding hole in the knife tang.  I'll be sure to take more pics with the next knife to show that process a little better.

This is a terrible pic, but I think you can see where this knife is headed.  I used a ceramic detent ball in this knife and it really made opening and closing the blade much smoother than a stainless steel detent ball.  I'm very pleased with how the ceramic performs.

This final pic shows the lock/tang configuration.  It locks up nice and tight and disengages smoothly.  Sweet!  This is turning out to be a nice design.

That's it for last weekend's work.  For this week, the details begin.  I can't wait to see how this little fellow will look with some file work and a little accent color on the liners through anodization.  Adding the details to a knife is like putting the decorative icing on a cake; it's fun to do and really enhances the overall look of the knife.  

I've decided to keep this one for my own use to replace the knife I lost over a month ago.  I feel almost naked without having a knife in my pocket and am looking forward to calling this little gem my own.  It will essentially be my business card that I will carry with, to show to people who ask me about my knives.  Should be a nice presentation and a good user to boot.  Thanks for following along with me on these builds.  Feel free to leave a comment or drop me an email if you have any questions.

-  Brandant Robinson

Monday, January 4, 2016

One Down, Two More to Go

A very happy new year's greetings, my fellow knife lovers!  I hope everyone enjoyed the holidays.  I sure did.  Spending time with my family is always a wonderful experience.  I hope this year will be a good one for everyone.

With the time off during the holiday, I got to spend a few extra hours out in my little shop.  In that extra time I was able to complete my "Polished" razor and make a little more progress on the two "Glaucus" knives.  Here are some pics of my weekend's work.

Here are the handles after they have been assembled.  The scales and bolsters were too thin to use my customary machines screws, so I used pins to hold the bolsters on and epoxy and pins to hold the Micarta scales in place.

Together with the handle scales is the finished blade.  It has been hollow ground and hand finished to a 600 grit satin finish.

I just received my new maker's mark stencil and I was excited to see how it would look.  I'm very pleased with the results.  The gentlemen on the knife forums often push the idea of having the maker's name and not just initials or another mark on their work.  It makes researching the maker much easier.  I think my new mark looks pretty classy.  How about you?

Here is the first assembly of the knife with the pivot and the stop pin in place.  Well, I'll be... It looks like a razor.

The back spacer has been added to the tail end of the handle.  Now it just needs a little shaping.

Here's a photo of all the finished parts ready for final assembly.  The scales have been rounded off a little for comfort and finished up to a nice mirror polish.

And here are a couple photos of my first finished razor.  Pretty cool if I do say so myself.  I took it for a test run and found that it worked quite well.  It was my first time shaving with a straight razor, so I looked like a teenage boy after his first shave.  But, I'm sure that after a little practice, I'll be using this razor on a daily basis.  There is something special about using a tool that you made with your own hands.

Now, for the progress on the two Glaucus knives.

Here are the handles of the two knives after the scales and bolsters have been fit together.  All bolsters and scales get a 30 degree dovetail for a little something extra.  From here, I will profile each handle and start working on the blades.

This photo shows the blade for the first Glaucus knife after it has been hollow ground.  It's a small little thing, only 2 inches long from the tip to the bolsters.  My hopes is that it will make for a great knife to always have in your pocket.

I decided to work a little more on this knife, and maybe even finish it, before tackling the second one.  I fit the spacer, assembled the pivot and stop pin, and began the work of shaping the handle.  It still has a ways to go before it will be finished, but it's far enough along for me to begin its evaluation.  So far, it's meeting all of my design criteria.  It's small enough to be carried in the coin pocket of a pair of jeans and just the right size to pick out splinters, open mail and packages, and perform all those every-day tasks that one needs from an EDC.  It's also quite comfortable in the hand for such a small knife.  I'm very pleased with how this design is working out.  This should be a terrific little knife.

Well, that concludes the progress on these knives.  Stop by again next week to follow along with these builds.  Thanks for coming along with me on this knife-making adventure here on the Robinson Edge.

-  Brandant Robinson

Monday, December 28, 2015

Three New Beginnings

First off, I hope that everyone had a wonderful Christmas.  I sure did.  There is nothing like family gathering around for the Holidays to cheer up one's heart as we celebrate the birth of the Savior of the world.  A belated Merry Christmas to everyone!

I still need to take some good pics of the Jaguar knife that I just finished last week so I can get it posted on my "Available Knives" page here on the Robinson Edge.  I really hate taking knife photos.  I can never seem to get a good image of my knives, so I end up putting it off.  Some day I think I might have to take a photography class to figure out what I'm doing wrong.

Since the Jaguar knife is finished, I decided to begin a new knife-making adventure.  I recently lost my own Virtue knife that I have been carrying for the last two years, so I thought I would make myself a new one.  I'll really miss that knife.  I chose a new design that I call "Glaucus" which is named after the Greek god of the sea.  It's a small little knife with a blade just a hair over 2 inches.  It should be the perfect size to keep in the coin pocket of a pair of jeans or slip into a pair of slacks for Sunday dress.  I know I'm going to regret this, but I opted to make these knives at the same time, one to keep, and the other to offer up for sale.  I've also always wanted to make a straight razor, so I thought I would give that a go too.  I made up razor design some time ago and have been anxious to try it out.  I guess three knives at the same time isn't too crazy.  I just hope I can keep all the parts sorted out.

Here are the raw materials that I will be starting with.  All the blades will be from CPM154, my very favorite steel.  Liners are all 6AL4V titanium.  The bolsters and spacers for the Glaucus knives will be from 416ss and the bolsters for Polshed (the straight razor design) will be from nickle silver.  I chose to use some mammoth ivory for the scales on one of the Glaucus knives and stabilized buckeye burl for the other.  I thought that I would use green-dyed and stabilized maple burl for the scales on Polished as pictured above, but changed my mind and decided to use black Micarta since it will be around a lot of water.

After a lot of work, all the parts have been rough cut and laid out.  I can already see that I'll have to be very careful to keep from getting all those parts mixed up.  I decided to make the Glaucus with the buckeye scales with front and rear bolsters and the other with the mammoth scales with front bolsters only.  I really love those mammoth scales and wanted to show as much of them off as possible.  I should be able to keep almost all the bark on that mammoth intact if I really careful.

Here are the three blades after being profiled and surface ground.  I've center punched some divots where the holes will be drilled for the pivots and for the thumb stud screws on the Glaucus knives.

All blades have been drilled and are ready for heat treatment.

Here are the blades all wrapped up and ready to enter the Evenheat oven for hardening.  The blades get heated up to 1850 degrees F, air quenched between two steel plates, sub-zero treated with dry ice and then two temper cycles at 400 degrees for two hours each cycle.  I don't have a hardness tester, but this "recipe" should yield a hardness of around 59-60RC.

I accomplished a little more work over the holiday weekend, mostly fitting the bolsters and scales on the Glaucus knives, but I really got into it and neglected to take any photos.  I have several days off this week for the New Years holiday and hope to get out to my shop for some extra holiday shop time.  Thanks for stopping by the Robinson Edge and a Happy New Year to all.

-  Brandant Robinson