Sunday, April 12, 2015

Eagle Knife Build Complete

The following photos show the progress that I made on my son's knife this weekend.

I tried another new technique on this knife, that of jeweling the insides of the liners.  It's a very subtle embellishment, but it looks really cool.  I do this by covering the liner in some valve grinding compound that I purchased from the autoparts store.  I chuck a rotary tool felt cylinder in my drill press and lower the felt until it makes contact with the liner.  I allow it to spin there for a few seconds and them slide the liner over and make another mark.  It's a little tedious, but I think it will be worth the extra effort.


Here is a shot of one of the liners after it has been jeweled.  I hope you agree that it looks very classy.  The thing I liked most about doing this is that I don't have to spend a lot of time polishing the inside of the liners, and I really hate polishing the inside of liners.


Here is a photo of the blade after it gets a nice satin finish.  I use 1500 grit sandpaper to put the hand-rubbed finish onto the blade.  By the way, my new grinder worked absolutely fantastic when it came to hollow grinding the blade.  I'm very pleased with the new grinder.  It's making my time in the shop much more pleasant.

This picture shows the liners after they have been anodized.  I really love the way the jeweling looks on the blue liners.  Very classy indeed.

I thought I'd post a pic of my hand sanding jig that I just made.  It's really a  simple thing, just a piece of steel angle that has been drilled and tapped to accept a bolt that passes through the pivot hole in the blade.  I put a washer on under the head of the bolt so that I don't sand away that area.  There is also a piece of red spacer material glued to the jig to help cushion the blade and guard against scratches.

 I turn my own thumb studs for all of my knives.  That way, each knife gets a custom thumb stud that fits the design.  I don't have a metal lathe, but my little wood lathes works pretty well.  I use an assortment of files and sandpaper to achieve the design I want.  I drill and tap the bottom of the stud to accept a 0-80 screw that will hold it to the blade.  The wood tool rest is there so I don't damage my good steel tool rest.


I still need to put an edge on the blade, but other than that, it's finished.  I debated whether or not to do some etching or engraving on the bolsters with something to commemorate my son's achievement, but I decided against it.  I did, however, choose to anodize the liners blue, which together with the red scales and white (well, silver) bolsters, give a very patriotic "flag" theme.  I sure hope he likes it and that you like it as well.  Thanks for following along with this build.  The next one will certainly be one that I will make available for purchase.  I really need to sell some knives to pay for my grinder.  Thanks for stopping by the Robinson Edge.

-  Brandant Robinson

Monday, April 6, 2015

File Work on the Guardian Knife

I truly enjoyed the Easter weekend.  I had a great time just spending time with my immediate and extended family, eating burgers and shooting the breeze.  Amid all of the festivities, I didn't get to spend much time out in my shop, so I didn't get the knife finished as I had hoped.  But, I don't regret it at all.  I did, however, get a little time in the shop and made a few strides of progress on the knife.

Before I can get the blade heat treated, I need to get all the file work done on the spine, since the blade will be too hard to file after heat treatment.  The tools above are those that I will need in order to produce the pattern that I have chosen for the blade spine and the spacer.  They are a ruler, exacto knife, two round files, a three-corner file, and a jeweler's saw.

The first step is to black out the edge to be filed so I can see my marks.  I use a black sharpie marker along the top edge of the spine of the knife and the spacer (shown above).  I then use a ruler to mark increment lines of 1/8" to get the proper spacing for the pattern.  I do this with an exacto blade.  I used to make the lines with a sharpie, but the lines were too broad, hence the exacto blade.  If you look closely at the photo above, you will see the first diagonal mark that I started with the jeweler's saw on the far left of the spacer.

I really got into the zone when I started filing and forgot to take progress pics along the way.  But, you can see above the final product.  This is a simple design that I call "V's and O's" along the blade spine.  The name is kind of self explanatory.  The lines are cut with the saw and the semicircular cuts and done with a round file.  I think this pattern will look good on this particular knife design.  Now that the blade has been filed, it's into the oven for heat treatment.

The next step after heat treatment will be grinding the hollow into the blade.  That's the part I have been looking forward to since getting my grinder finished.  I can't wait to see how the grinder performs.  I'll give everyone the lowdown when I get to that point.  Thanks for stopping by the Robinson Edge.

-  Brandant Robinson

Thursday, April 2, 2015

Guardian Build Continues

I got quite a bit done on my son's knife today and took some progress pics along the way.  Like I said before, I have a tight schedule on getting the knife done, so I'm working as fast as I can.  Luckily I have a couple extra days off from work this week, so I should be able to squeeze in quite a bit of shop time over the next couple of days.
 
I tried a new technique with fitting the scales to the inside curves of the bolsters.  I usually make the front bolsters first, followed by the scales, and finish off with the rear bolsters.  This way, I only have to fit one joint at a time.  But, in my exuberance to get this knife made, I accidentally skipped a step and made the rear bolsters before the scales.  In order get the correct contour, I used some Sculpey clay and formed it into the scale slots on the handle.  I put the Sculpey clay and knife into the oven at 275 degrees for 15 minutes to harden the clay.


Here is one of the Sculpey clay templates after it has been hardened.  It worked pretty well.  I was worried that the clay would shrink, but it didn't.

 
I decided to use some of my dyed and stabilized maple burl for the scales for this knife.  I sliced them thin on my band saw and super glued the Sculpey clay templates onto the burls.
 
I used the Sculpey clay templates to grind off the excess wood from the burl scales.  I forgot to take progress pictures while making the scales, but this is what they looked like after being shaped and drilled to accept screws.

Here is the tang of the blade after grinding in the lock ramp.  I use my disk sander set at 8 degrees to set the angle of the lock ramp.

I use a black sharpie to color in the inside of the right liner along the bottom where the lock bar will be cut out.  I also screw the spacer to the liner so I can get the right open location for the blade.  Once the pivot assembly is installed and the blade in place, I use an exacto blade to scratch along where the tang meets the liner.

You can see in the above pic the scratch mark where the lock face will be and the additional scratch that runs the length of the liner where the lock will be cut out.

I use a small Dremel cutoff wheel mounted in my drill press to cut the lock bar free in the liner.  The liner is held in a drill press vise and I manually move the vise into the cutoff wheel to make the cut.  I leave a little extra material at the lock face so I can fit the lock to the tang down the road.

Here is a picture of the lock after it has been cut.  I use small strips of sandpaper to polish up the surfaces of the cuts.

After assembling the handle completely, I round off the edges of the bolsters and scales and get everything fitting tightly.  I also polish the entire handle and put a satin finish on the bolsters, liner edges, and back spacer.  I think it is turning out quite nicely.

I'll be adding some file work on the spacer, liners and the spine of the blade.  But for now, this is where I had to stop.  I should have time over the next couple of days to make a lot of headway, if not finish the knife completely.

Thanks for following along with this build and for stopping by the Robinson Edge.

-  Brandant Robinson

Monday, March 30, 2015

My Son's Eagle Commemorative Knife

It's nice to be making knives again and the new grinder is making my life very happy.  As I have mentioned before, I am making this knife in commemoration of my second son earning his eagle scout advancement.  I thought it might be nice for him to receive one of his proud father's knives to hopefully keep as an heirloom to pass down to his own son some day.  Besides, my oldest son got one of my knives when he earned his eagle, and his little brother would feel left out if he didn't get one too.


This build begins like all others, with a design printed off on paper.  Cardstock is better than paper, but I was out at the time and didn't want to make a Walmart run.  I design all my knives on CAD so that I can make sure everything works just right before I start building.  With a folding knife, there are a lot of things that have to be tweaked just right in order for everything to work right.  There is a significant amount of opportunity for something to go wrong in a folder design.  The blade has to stop in the right open and closed positions, the lock and back spacer have to engage the tang in just the right locations, the blade edge has to stop before slamming into the back spacer when closed, and a hundred other things to consider.  Designing on a computer offers the opportunity to mess around with the design, clearances, rotations, . . . without wasting any materials.  This isn't to say that a computer is a must, in fact, I have designed several using paper cutouts, but a computer speeds things up and is more precise.  This is the second time I have built this design with I call the Guardian.  The first one turned out really great and I think this design fits the personality of my son.  I hope he likes it.

I chose to use 440C for the blade.  440C is a classic stainless steel that produces a great blade with all the qualities that are necessary for a piece of cutlery.  It holds a good edge, is fairly easy to grind, and polishes up nice and bright.  I'll use 416 stainless steel for the bolsters and 6al4v titanium for the liners.  I still haven't decided on scale material yet.  I'm thinking some stabilized burl or maybe micarta.

This photo shows the blade that has been rough profiled at the top and the liners at the bottom.  I tried a new technique with the liners.  I'm always looking for better ways to do things and I picked up this idea from the internet.  I used a couple dots of super glue between liners to hold them together as I profiled them and drilled all the holes.  It worked really well, much better than messing around with clamps and the balancing act that ensues when trying to drill holes in the right locations.  You might also be able to see that I actually have three liners glued together in the picture.  The third will be used as a template for future knives of this design.

This is a shot of all the parts so far: the blade, two liners, back spacer, two front bolsters, and two rear bolsters.  Doesn't look much like a knife yet at this point, but it will soon.

 I tried the same technique with the super glue for the bolsters and it worked really well.  It kept everything aligned while profiling and drilling.  The glue pops off really easy by heating up the part with a propane torch for a few seconds and giving it a tap on the bench.  I then take the dried glue off on the disk sander.  A little acetone helps to clean all the glue off too.

Profiling the bolsters while attached to the liners takes care of three out of four sides, but leaves the inside curve that will butt up against the scales untouched.  In order for right and left bolsters to match exactly, I pin the two matching bolsters together before contouring the inside radius.  I didn't glue these together, I just relied on the pins to maintain the alignment.

Here's a photo of all the parts after they have been profiled, drilled, countersunk, and tapped.  Lot's of holes, but each one is necessary.

The knife handle has been screwed together in the last pic into a single assembly.  Now it's looking like a knife should.  The blade has just been laid unattached inside the handle to get the overall look of the knife.  I really like this design.  It's kind of gentleman's style meets tactical.  I still need to add the pivot assembly before I can check out all the mechanical workings of the knife.  The blade is basically ready for heat treatment, but I think I will do some file work on the spine before it gets hardened to punch up the "Wow" factor.  There's still a lot of work yet to accomplish, but so far, I'm pleased with the progress.

It sure feels good to have a knife project underway again.  I've been experiencing knife-making withdrawals for the last few weeks as I have been focused on making my grinder.  There is still a lot of work to be done, but the bones are now in place.  I'm really looking forward to grinding the hollow grind in the blade with my new grinder.  I have no doubt that it will be a huge step up from my wooden disks with sandpaper edges (go to my shop tour page to see what I mean).  Hopefully next week I'll get a chance to finish the blade and continue working on the handle.  The more I think about it, the more I'm leaning toward using a piece of stabilized maple burl that has been dyed red and black for the scales.  I think my son would really like that.

Thanks for stopping by the Robinson Edge.

-  Brandant Robinson

Saturday, March 28, 2015

Success at Last ! ! !

Her she is in all her glory!


Maybe not to your eyes, but to mine, she's the most beautiful of all tools I've ever beheld.  Of course, that might be due to all the time, blood, sweat and tears that I have invested in her.  It was a long road, not without a bump or two along the way, but she's finally purring like a kitten.  And I mean, she really purrs!

I put the grinder through its paces today and found it working superbly.  It runs smoothly, quietly and without vibration.  I couldn't be more happy with how it works.  It has enough power when I put it in high gear to trip the breaker in the power strip that its plugged into.  I'll have to plug it in directly I guess.  I'm not terribly happy with the on/off switch and plan to make a few modifications to it, like remove the black electrical tape (wink, wink).  I still need to put a little more paint on a few parts as well and the extension arm on my tool rest is not long enough to use with my contact wheel.  But, all in all, I'm very pleased with its operation.

I have a short list of additional accessories that I would like to add in the future, such as: a vertical tool rest, an articulating tool rest, a small wheel arm, and a few more contact wheels of various sizes.  But, those are for the future.  For now, I'll use it as it stands. 

I have to admit, that I'm glad this grinder build is over and I can move on to the reason why I built it in the first place, building knives.  I actually had the time to start another knife build project this weekend that I will be posting progress pictures of as soon as I can get the photos organized.  As I mentioned before, I need to make a knife for my son in recognition of him earning his eagle scout award, and that is the knife that I started working on.  He worked hard over many years to earn his eagle and deserves something nice to commemorate the occasion.  His Court of Honor, where he will be awarded his eagle, is just a couple weeks away, so I need to get busy.  I think you will enjoy following along.

Thanks for stopping by the Robinson Edge.

-  Brandant Robinson

Saturday, March 21, 2015

Belt Rack

Well, I had really hoped that the drive shaft for my grinder would arrive by now, but unfortunately the supplier didn't ship it out in time and it won't be here until next week.  So, after sheading a few tears and feeling sorry for myself, I took the opportunity to organize my shop.

With the addition of the new grinder, I had to rearrange my benches in order to get my new tools into a place where it will be usable.  It took a lot of thought and shifting things around to get all the tools in places where they can be easily used without feeling too crowded.  In a little shop like mine, that was quite a task, but, I think I have everything accessible now.

I also took advantage of the extra time to make some racks to hang grinding belts from.  I built them out of some scraps I had lying around the shop.  An old 2x4, a handful of 1/4" dowel rods and a little elbow grease and they were ready to hang.  Here are a few photos to show you how they turned out.

 One of the racks finished and ready to hang.

 Both racks installed in the corner next to the new grinder.  It's good to store things next to where they are used.  Point-of-use storage is what they called it in a class a took in college a long time ago.


I ordered a bunch of different belts to try out.  Since I have never used a 2"x72" grinder before, I'm not sure which kinds of belts will work best for me and what I do, so a good variety at the start should allow me to decide which ones I will order more of.  All in all, I think it turned out quite nice.

Even though I didn't get my grinder finished today, I still feel like I was able to accomplish something productive.  I'm still chomping at the bit to give the grinder a try though.  It's been weeks now since I've worked on a knife build and I'm really starting to miss it.  I better get this thing finished soon before I start going through knife making withdrawals.  I don't think there's a cure for that kind of a disease.  Thanks for stopping by the Robinson Edge.  The next post should be of the grinder up and running.

-  Brandant Robinson

Saturday, March 14, 2015

Knife Grinder - Take 2

Well, this weekend I made some significant progress on the knife grinder.  In fact, I would have been making sparks and little piles of black dust if it wasn't for a faulty drive shaft.  I decided to try making my own drive shaft from a piece of cold-rolled steel that I picked up at the local hardware store.  I cut and installed the keyways in each end, installed the shaft on the pillow block bearings and attached the drive wheel and pulley.  With much trepidation, I started up the grinder, eager to see how it would run.  Everything seemed to work fine, with one exception; there was a significant amount of vibration.

I investigated where the problem was coming from and noticed how the drive shaft was wobbling around.  I disassembled the power train and took a good look at the shaft.  I rolled it across the table and it seemed to roll fairly smoothly.  I set it on a flat surface and rolled it back and forth as I watched for gaps between the shaft and the flat surface.  It turns out that the shaft had a wave which oscillated from one end to the other.  Apparently the cold-rolled dowel rod from the hardware store isn't very precise.  So, with a click of the mouse, I placed an order for a precision manufactured shaft.  I had to place an order anyway since I was one piece of steel short that I needed to make the contact wheel arm.  The following are a few photos of the build so far:

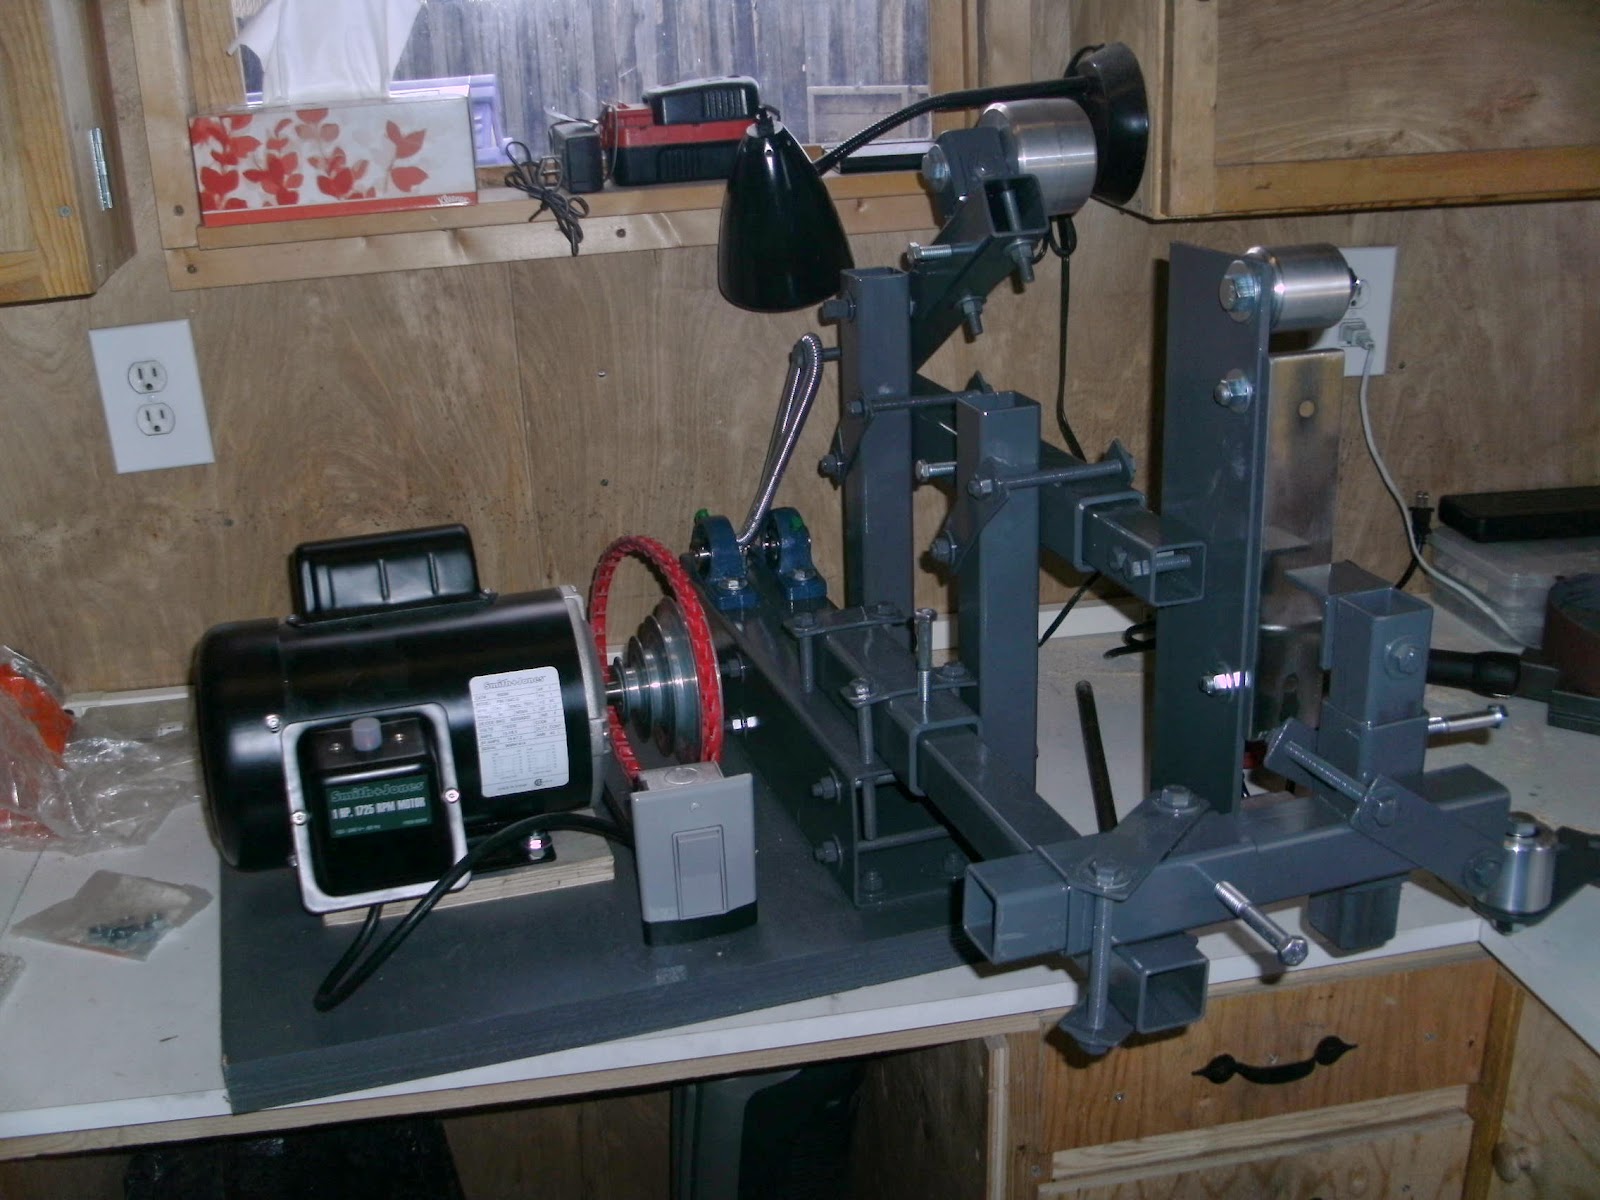
Here's the grinder after I have attached it to its plywood base.  It doesn't look very impressive yet, but it will soon.

A good coat of paint will keep it looking good and keep it from rusting.  I debated about what color to paint it for quite a while but finally settled on a dark grey color.  I think I made the right choice.

Here are the parts for the flat platen, slack belt, and tool rest attachments after they got a good coat of color. 

Here is the grinder completely assembled with the slack belt arm attached.  This is right before I fired it up for the first time and before the pain of tracking down the vibration problem began.  At least it looks good.

This is where I left off for the day.  You can see the on/off switch has been installed to complete the build.  The flat platen and tool rest arms have been attached for visual reference.


I had hoped to be finished with the grinder today so I could give it a try with a new knife build next week.  But, if the supplier comes through with my order as promised, it should only take an hour or so to get the grinder running when the parts get here.  Maybe I'll be making my son's knife next week after all.  Thanks for stopping by the Robinson Edge.

-  Brandant Robinson