Monday, February 29, 2016

Testing Video Upload

Not a lot happened in the shop over the weekend, so no new photos to post this week.  And I still haven't finished my light box so that I can take some good photos of my work yet.  It was a busy week.

So, since shop time was slow, I thought I would mess around with posting videos here on the Robinson Edge Blog.  I think I've finally figured things out.  With fingers crossed, here's a short video of the last Glaucus Knife that I finished up a few weeks ago.  I hope this works.  Thanks for stopping by.

-  Brandant Robinson


Monday, February 22, 2016

Jeweling and Cutting the Lock

I made a little progress on the Bobcat knife this last weekend that I would like to share with you.  The knife is getting very close to completion, with only a few more details left before it's done.  Here are some progress photos of the Bobcat build.

Here is my setup for jeweling the insides of my liners.  I install a felt cylinder in the chuck of my drill press.  I coat the face of the liner that will be jeweled with valve grinding compound that I picked up at my local auto supply store.  I have a piece of paper towel on top of a plywood base to keep the drill press table clean.

I manually locate each swirl and lower the drill press spindle and let it grind for a few seconds before moving on to the next swirl.  I overlap the swirls until the whole liner has been jeweled.

Here's a picture of the completed liners.  It's a very subtle detail that is kind of hard to see inside a finished knife, but I think that it's definitely worth the effort.

Time to cut the lock.  I've shown how I locate the lock face before by coloring in the area with a marker and scratching a line where the lock will contact the blade tang.  Here you can see the liner clamped into my drill press vise and a thin cutoff wheel mounted in the drill press.  I manually slide the vise across the table and into the cutoff wheel and guide it along the scribed line.

Here is the liner after the lock has been cut in.  It's a simple process that produces great results.

Here is the completed lock.  At this point I have filed back the face of the lock until it engages with the tang at just the right angle and depth.  I have also located and installed the ceramic detent ball with a corresponding hole in the blade tang and bent the lock out to preload the lock spring.  I've shown this process before, and since I didn't get any pics of this step, you can refer pack to previous posts on earlier builds.

Here's a new setup for me.  I did some research online and found how a lot of makers will at a layer of carbide to the lock face to eliminate any "sticking" of their locks.  I have had that problem in the past, so I did some deeper digging to find out more about the process.  The commercially available carbidizers are relatively expensive and were out of my price range, but as I continued to research, I found that some used a very simple alternative approach with good success.  Using my shop-built electro etcher as a power supply and a vibratory etcher that I purchased at the local hardware store for $20.00, I built my own makeshift carbidizer.  I installed an old carbide cutter in place of the etching point which will be the source of the carbide.  By attaching the positive lead from my etcher to the carbide tip and the negative lead to the liner, I was able to lay down a thin layer of carbide to the lock face.  Worked like a charm and absolutely no lock sticking!  A simple and low-cost solution.  It's amazing the information you can find on the internet.

The last thing I did in the shop was to add my mark to the finished blade.  I've shown this process several times, but here is a photo of the end results.  I like it!

I should get this knife completed next weekend without too much difficulty.  Thanks for following along with me on this build.

-  Brandant Robinson

Wednesday, February 17, 2016

More Work on the Bobcat Knife

My shop time this last weekend was limited, but I did manage to make a lot of progress on the Bobcat knife in a short time I had to play, enough to know that this is going to be a real nice one in the end.  Here are a few pics of the build process.

With the bolsters all polished up to a mirror finish, they get a dip into some muriatic acid for some etching.  The etching process brings out the layers and patterns in the Damasteel.  I've found that about an hour in room temperature acid is about the right soak time.  I do move the piece in and out of the acid every few minutes to remove the bubbles and keep the etch going.

While the bolsters are taking their bath, the scales get several coats of tung oil.  After the oil dries the scales will get a light coat of Renaissance wax and a buff until they shine.  This process really brings out the three-dimensional qualities of the buckeye burl.  This stuff is really beautiful.

While the bolsters etch and the scales dry, I take a few minutes to polish the heads of all the screws until they are bright and shiny.  I use this small plate of threaded titanium to hold the screws while polishing them on the buffer.

Time to focus on the blade.  I attach my shop-made edge guide to the blade tang so that the guide lines up with where I want the plunge cuts to be.  Now, it's on to the grinder from some hollow grinding.

At this point the blade has been ground to a 220 grit finish.  From here on out it's hand sanding.  I'll take the blade up to 600 grit and then give it a good 600 grit satin finish.  I missed taking a photo after the hand sanding was finished, but this blade turned out really nice.  the grind was even, free of any ripples, and the plunges were spot on.

After the etching is complete, the bolsters get a very light buff with some pink scratchless compound on the buffer, followed by hand polishing.  This photo doesn't show off the Damasteel pattern very well, but I'll take some better photos of this detail when the knife is finished.

I really enjoy doing filework on my knives.  I tried a little variation on a favorite pattern with this one.  Using a basic twisted ribbon design, I alternated directions every two twists.  The new pattern catches the light differently at different angles, kind of like the facets of a cut gemstone.  It turned out quite nicely.  Again, the photo resolution is terrible, but better pics will follow soon.

The last task for the weekend was to filework the liners.  I went with a climbing vine pattern which, at this small scale, is very challenging to get right.  In the end, the pattern came out great.

That's it for this week.  Next week I'll get the finishing touches put on this knife and if everything goes well, the knife will be finished.  It should be something extra special once done.  Thanks for stopping by the Robinson Edge.

-  Brandant Robinson

Monday, February 8, 2016

Let's Build Another Bobcat

I hope everyone enjoyed their weekend as much as I enjoyed mine.  It was a good end to a long and stressful week.  I find my time in the shop very restful and therapeutic, a nice diversion from the real troubles of life.

First off, I was able to get my little Glaucus knife completed, but I'm determined to take some good photographs of it before posting the final pics.  I plan on making a good light box to take photos of my knifes in.  I think that might be a big step for me in producing a good image of my work.  But, since I didn't have all the materials on hand to build the light box, I made the decision to start on my next knife.

I decided to make another Bobcat design knife.  So far I've made two knives of this design and have received some very positive feedback from their new owners.  So, with that information, I made up my mind to make another Bobcat knife and make it something special.  Without further adieu, let's get started.

Here is the starting point for all my knife builds, the raw materials.  Even at this point in my knife-making adventures I am still amazed that these chunks of steel, titanium and wood are destined to become a beautiful and functional tool.  The materials of choice are 6AL4V titanium for the liners, 416 stainless for the spacer, Damasteel "Dense Twist" for the bolsters, and stabilized buckeye burl for the scales.  Not pictured is the CPM154 blade steel.  I slipped out to my shop the night before and profiled, hardened, and cryo treated the blade.  At the time of this photo, the blade was in my heat treat oven undergoing its second temper cycle.

The big chunks of material have all be cut into smaller chunks.  The rough-cut parts are now ready to be refined and shaped into their respective components.

The liners have both been profiled and all the holes drilled in the appropriate locations for assembly.  The spacer also has corresponding holes drilled through it.  The scales have been rough cut, matched, and the dovetail ends have been ground at 30 degrees.

I decided to try fitting the bolsters and scales a little bit different this time.  I thought I would start with the scales in the middle and work outward.  This photo shows the scale of one liner pinned in place.

I left the bolsters unshaped so I would have a little wiggle room for fitting.  the mating face of both bolsters have been dovetail ground at 30 degrees to match the scale and set in place.  Each bolster will get clamped to the liner and drilled to locate the screw holes in the right places.

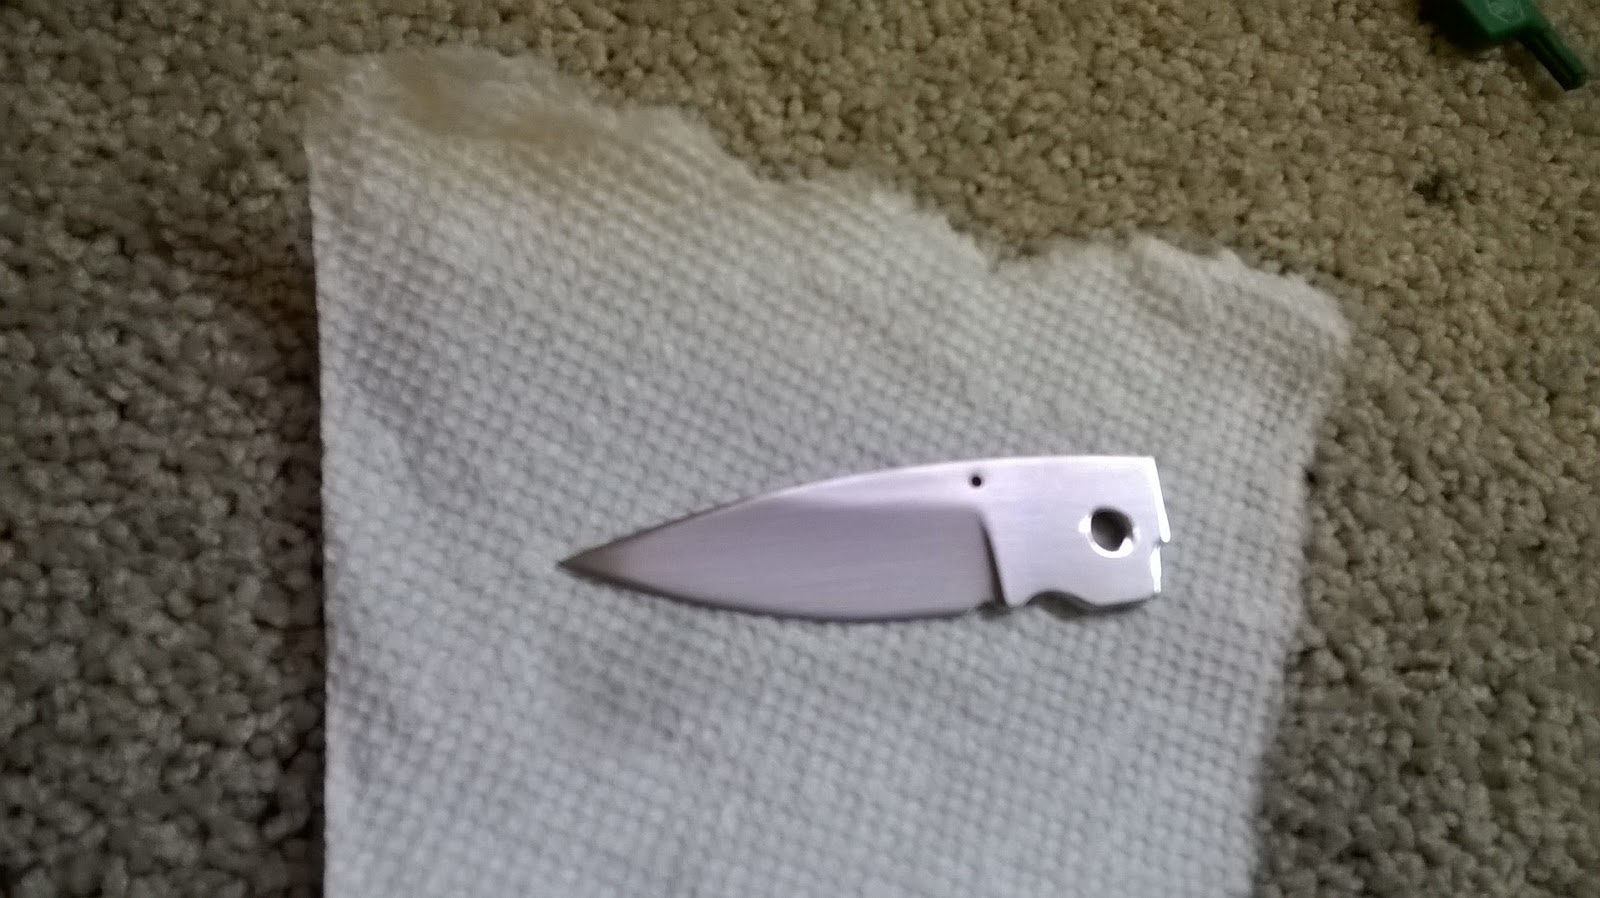
All the parts have been drilled, countersunk where appropriate, and tapped to accept 0-80 machine screws.  The blade is also done tempering and gets its photo debut.

The bolsters and scales are all fastened together with screws and ready to be profile ground.  Assembling the handles in this manner gave me some extremely tight joints.  There is no daylight in  the joints of this fit.  Awesome!

After a few minutes on the grinder, the handles have each been profile ground.

Time to build the pivot mechanism.  The photo above shows the parts and necessary tools to perform this step.  The parts that make up the pivot are the pivot pin and screws, a stainless steel bushing, and two washers.  The essential tools are the pivot lap for refining the length of the pin and bushing, and the micrometer for getting the lengths exact.  I didn't take progress photos, but the process for building the pivot goes something like this:

1. polish the washers all bright and shiny.  2. stack the washers on the blade and take a measurement of the thickness.  3. lap the bushing to the thickness of the blade plus the two washers.  I usually add about 1 to 2 thousands of an inch to this measurement for clearance.  4. lap the spacer to the same thickness as the bushing.  5. lap the pin length down to fit the width of the pivot plus the thickness of the liners.

That's basically the process I follow for pivot assembly.  It's absolutely necessary to "nail the numbers" when building the pivot system if you want a smooth action.  A few thousands too few or too many lead to a tight action or one that is lose.  It's a little fussy, but definitely worth taking one's time to get it right.

Here's a shot of the parts waiting for their first assembly.  With the exception of a thumb stud and screw, this is essentially the whole knife.  A lot of refinement and detail happens from here, but at this point all of the pieces of the puzzle are on the table.

The knife is put together for the first time.  I did dialed in the open and closed position of the blade before assembly, but didn't get any photos of that.  It's easy enough, just grind off the front of the spacer until the blade opens to the right position and drill and install the stop pin to keep the blade edge from contacting the spacer in the closed position.  The action of this knife is silky smooth and will only get better as the blade tang gets polished up.

With the knife assembled, I can start working on the overall shape of the handle.  I round over the sides of the knife to give the knife a nice appearance, but most importantly a comfortable feel in the hand.  Here is the knife after grinding up to 220 grit.  It's hand sanding from here on out.  I will take it up to 1500 grit and give the bolsters a quick buff to get the Damasteel ready for etching.

Here is a look at the spine of the knife.  Everything fits nice and tight.  Zero gaps is the goal.  I don't worry about polishing up the edges of the liners or the spacer at this point.  Those parts will get fileworked soon, so no need to get a high finish until that work is accomplished.

Well, that about does it for this week.  Tune in next week when I should be able to get the blade finished and begin the detail work.  Thanks for following along with me on this knife-making adventure.

-  Brandant Robinson

Monday, February 1, 2016

Almost There

This weekend was very productive in my knife shop.  I was able to almost get the second Glaucus knife finished.  If only I had had just a couple more hours . . .

Here's the blade after several hours of hand sanding.  The 600 grit finish turned out quite nicely.  I thought about a mirror finish on this blade, but it just didn't look right, so I went to my old standby of a hand-rubbed satin finish.  In my eyes, this is a much better finish.

Here is the left side of the handle.  If you look closely at the bottom where the bolster and scale meet, you will see that the thumb notch has been ground out to allow for the lock to be released with one hand.  Here's another big confession moment.  That makes two with this knife.  Ouch!  I was hurrying too much and actually ground off the wrong scale.  So, that forced me to remake an entire liner.  What a pain!  That's the second piece I've had to remake for this little knife.  I guess I can call this a break-even knife.  Anyway, with the new liner in place, everything was back on track.

Time to work on the lock. To begin with, the area of the lock gets blacked out with a permanent marker.  I attach the spacer and the pivot/blade mechanism and scratch a line along the back of the tang where the lock will make contact with the blade.  I also scratch a line along the length of the lock to guide me as I cut it out.

This photo shows the lock after it has been cut out.  I do this with a small cutoff wheel mounted on a mandrel which is chucked up in my drill press.  The liner is held in my drill press vise and I manually feed it into the cutoff wheel for a nice, smooth cut.  Works great.

The liners get a jeweled finish on the inside surfaces.  The picture looks a little blue, but they are really natural titanium and have not been anodized yet.

After filing the lock face down to where it mates up with the blade tang correctly, I drill and install the detent ball.  This detent ball that I used on this one is ceramic.  It really makes a difference in how smoothly the blade opens.  It's definitely worth the little extra cash for the ceramic over stainless steel.  Plus, it doesn't give me any problems during the anodization process like stainless steel does.

The majority of my shop time this weekend was eaten up in fileworking the spacer and liners.  The spacer got my favorite "twisted ribbon" pattern and the liners got a serpentine pattern.  These two patterns look really great against each other.  The liners have also been anodized a bronze color that looks fantastic against the creamy mammoth scales.

Here is the blade after my mark has been etched into the side.  I'm quite proud of my new mark.  It looks pretty fancy.

This is where I left off for the week.  You can probably see that I decided to put a satin finish on the bolsters.  The mirror polish looked nice, but mirror finishes show scratched way too easily and a knife made to use will get scratched.  Satin finishes look much better for much longer.  The knife is very near completion.  It needs a little bit of fine tuning on the pivot to make it silky smooth.  I also need to make a thumb stud and put an edge on the blade to finish everything up.

Here's a view of the spine.  It's a little out of focus, but you can kind of see how great the bronze-colored liners look against the scales.  Very nice!

This knife should be finished up this next week without too much trouble.  I'll take some good pics and also send out an email to my email subscribers when it's done and available for purchase.  If you're not on my list, just send me an email at theoldstump@live.com with "Subscribe" in the subject line and I'll add you in.  Thanks for following along with me on this knife-making adventure.

-  Brandant Robinson