Monday, December 28, 2015

Three New Beginnings

First off, I hope that everyone had a wonderful Christmas.  I sure did.  There is nothing like family gathering around for the Holidays to cheer up one's heart as we celebrate the birth of the Savior of the world.  A belated Merry Christmas to everyone!

I still need to take some good pics of the Jaguar knife that I just finished last week so I can get it posted on my "Available Knives" page here on the Robinson Edge.  I really hate taking knife photos.  I can never seem to get a good image of my knives, so I end up putting it off.  Some day I think I might have to take a photography class to figure out what I'm doing wrong.

Since the Jaguar knife is finished, I decided to begin a new knife-making adventure.  I recently lost my own Virtue knife that I have been carrying for the last two years, so I thought I would make myself a new one.  I'll really miss that knife.  I chose a new design that I call "Glaucus" which is named after the Greek god of the sea.  It's a small little knife with a blade just a hair over 2 inches.  It should be the perfect size to keep in the coin pocket of a pair of jeans or slip into a pair of slacks for Sunday dress.  I know I'm going to regret this, but I opted to make these knives at the same time, one to keep, and the other to offer up for sale.  I've also always wanted to make a straight razor, so I thought I would give that a go too.  I made up razor design some time ago and have been anxious to try it out.  I guess three knives at the same time isn't too crazy.  I just hope I can keep all the parts sorted out.

Here are the raw materials that I will be starting with.  All the blades will be from CPM154, my very favorite steel.  Liners are all 6AL4V titanium.  The bolsters and spacers for the Glaucus knives will be from 416ss and the bolsters for Polshed (the straight razor design) will be from nickle silver.  I chose to use some mammoth ivory for the scales on one of the Glaucus knives and stabilized buckeye burl for the other.  I thought that I would use green-dyed and stabilized maple burl for the scales on Polished as pictured above, but changed my mind and decided to use black Micarta since it will be around a lot of water.

After a lot of work, all the parts have been rough cut and laid out.  I can already see that I'll have to be very careful to keep from getting all those parts mixed up.  I decided to make the Glaucus with the buckeye scales with front and rear bolsters and the other with the mammoth scales with front bolsters only.  I really love those mammoth scales and wanted to show as much of them off as possible.  I should be able to keep almost all the bark on that mammoth intact if I really careful.

Here are the three blades after being profiled and surface ground.  I've center punched some divots where the holes will be drilled for the pivots and for the thumb stud screws on the Glaucus knives.

All blades have been drilled and are ready for heat treatment.

Here are the blades all wrapped up and ready to enter the Evenheat oven for hardening.  The blades get heated up to 1850 degrees F, air quenched between two steel plates, sub-zero treated with dry ice and then two temper cycles at 400 degrees for two hours each cycle.  I don't have a hardness tester, but this "recipe" should yield a hardness of around 59-60RC.

I accomplished a little more work over the holiday weekend, mostly fitting the bolsters and scales on the Glaucus knives, but I really got into it and neglected to take any photos.  I have several days off this week for the New Years holiday and hope to get out to my shop for some extra holiday shop time.  Thanks for stopping by the Robinson Edge and a Happy New Year to all.

-  Brandant Robinson

Monday, December 14, 2015

Almost There!

After this weekend in the shop, I am almost finished with the Jaguar build.  I know I say this about every new knife, but this one represents some of my best work.  I'm also quite happy with this new design.  It's slightly larger than I usually make with a couple other "firsts" for me.  Here are some pics of what I was able to get done.

This photo shows the scales and bolsters in their finished state.  The Micarta scales are nice and shiny and the bolsters all have a hand-rubbed 600 grit satin finish.

Before I cut in the lock, I need to get the closed position of the blade set.  This entails grinding away the tang where it engages the stop pin and a little grinding of the inside of the spacer.  This above pic shows the end product.

If you look closely at the photo, you can see a line scratched into the black marker on the liner.  This is the outline of where the lock will be cut out.

This is my setup for cutting out the lock.

Here is the lock after it has been cut out.  I'll clamp it in my vise and use some strips of sandpaper to polish up the cut.

In this pic, I'm dialing in the lock face.  I assemble the knife, clamp it in my vise, wrap a little tape around the lines to avoid scratches, and file away at the face of the lock until it engages properly.

Moving on to the blade.  Starting back at 220 grit, I start cleaning up the grind and begin the long and laborious task of hand sanding the blade finish.

Here's the blade after I reach 600 grit.  Looking good!

This is the carnage of sandpaper that went into polishing out the blade.

Now it's time to begin some detail work.  To start with, I blacken in the edge of the spacer and liners with a Sharpie and scratch witness lines at 1/8" intervals to keep the file work uniform.

I decided to go with one of my favorite patterns on the spacer, the twisted ribbon, with an additional twist (pun intended).  After about six twists, I reverse the pattern so the twists go in the opposite directions.  It's a combination of my alternating twist pattern and the twisted ribbon.  I'm sure you all wanted to know that.

Here's a little closeup of the completed spacer.

Here is a pic of the spacer after it has been sanded up to 600 grit.  Once it has been sanded, it goes for a spin on the buffer and then I hit the highlights again with 600 grit paper to give it a little contrast.  I like it!

For the liners, I'm going with a climbing vine pattern.  These thin spacers are a challenge for this type of detail, but it looks really cool when finished.  The photo shows the two liners with the initial cuts.

Here they are after the file work has been completed, the work has been sanded, and after a turn on the buffing wheel to make them all nice and shiny.  I might dedicate a post to file work sometime and take some pics with the good camera so you can see how it's done.  Look for it in the future.

With the file work complete, I was able to move on to jeweling the inside surfaces of the liners.  It turned out pretty good.

I chose to anodize the liners an ice blue color that compliments the red scales really well.

Here is the completed blade with my logo etched into it.  I'm thinking about changing my logo to something with some name recognition.  I've got a design sketched up, I just need to find someone who can make me a stencil.

The final task that I accomplished this week was to polish up all of the exposed hardware.  This little jig is a little piece of titanium that has threaded holes.  I use it to trim screws to length and to hold screws while I polish up the heads.  It works pretty well.  I still need to get around to drilling and tapping a few more holes so I can do multiples instead of one at a time.  But, for now, it works just fine.

Well, folks, that's it for this week.  I should be able to easily complete this knife in the coming week.  If you're interested in purchasing it, just shoot me an email.  It will go on sale publically as soon as I get it finished up.  Thanks for following along with me on this knife-making adventure.

-  Brandant Robinson

Monday, December 7, 2015

Progress on the Jaguar Build

It was a busy weekend, full of setting up Christmas decorations around the house and hanging up the lights.  I was still able to make a little progress on the Jaguar build this last weekend.  Here are the fruits of this week's labors.

To start things off, I was able to finish out the bolsters and the scales.  The Micarta scales get polished up to a nice, glossy finish.  The bolsters get a hand-rubbed satin finish.

Here is the knife once the closed position has been dialed in.  This is done by grinding away the tang where it makes contact with the stop pin.  I also had to grind away the inside of the spacer slightly so that the edge doesn't contact the spacer.

With the open and closed positions of the blade set, it's time to create the lock.  I color in the lock area with black marker and use a razor blade to scratch lines where the edges of the lock will be cut.  I also use a center punch to locate the position of a hole at the front and rear ends of the lock.

Here is my set up for cutting in the lock.  I clamp the liner in my drill press vise and use a thin cutoff disk mounted in the drill press.  I hand feed the liner through the cutoff disk until the lock is complete.  It usually takes 1.5 to 2 of these disks to finish a lock.

This is what the lock looks like after cutting it in with the disk.  It makes a nice, crisp line.  I uses some cloth-backed sandpaper to clean up the cut edges and finish things out.

Here is how I dial in the lock face surface to match the tang.  I assemble the knife except for the bolsters and scales.  I wrap some masking tape around the liners so that I don't accidentally scratch up the liners as I file the lock face and mount the knife in my vise.  Then, using a flat file, I grind away the lock face until it mates up with the tang and engages at just the right position.  Fitting the lock this way eliminates the need to disassemble and reassemble the knife a dozen or more times before getting the lock right.

The last thing that I worked on over the weekend was to begin the hand sanding on the blade.  I wasn't able to complete the satin finish, but I did get it done up through 400 grit.  This week I'll finish the blade up through a final 600 grit.  I also hope to get a lot of the detail work done on this knife.

Well, thanks for following along with me on this knife making adventure on the Robinson Edge.  I hope everyone has a fun and enjoyable Christmas season.  Stay tuned next week for another update on this build.

-  Brandant Robinson

Monday, November 30, 2015

The Jaguar Build

Well, I sure hope everyone enjoyed their Thanksgiving holiday as much as I did.  There is nothing better than spending time with family and loved ones while you're eating pie.  Between the fun and festivities, I was able to slip out to my shop for some quality build time as well.  Here is the product of the long weekend.

Here is my latest knife design that I call the Jaguar.  It's a little larger than the usual knife I make, with a blade just over 3 inches.  I'm excited to see how this design works out.

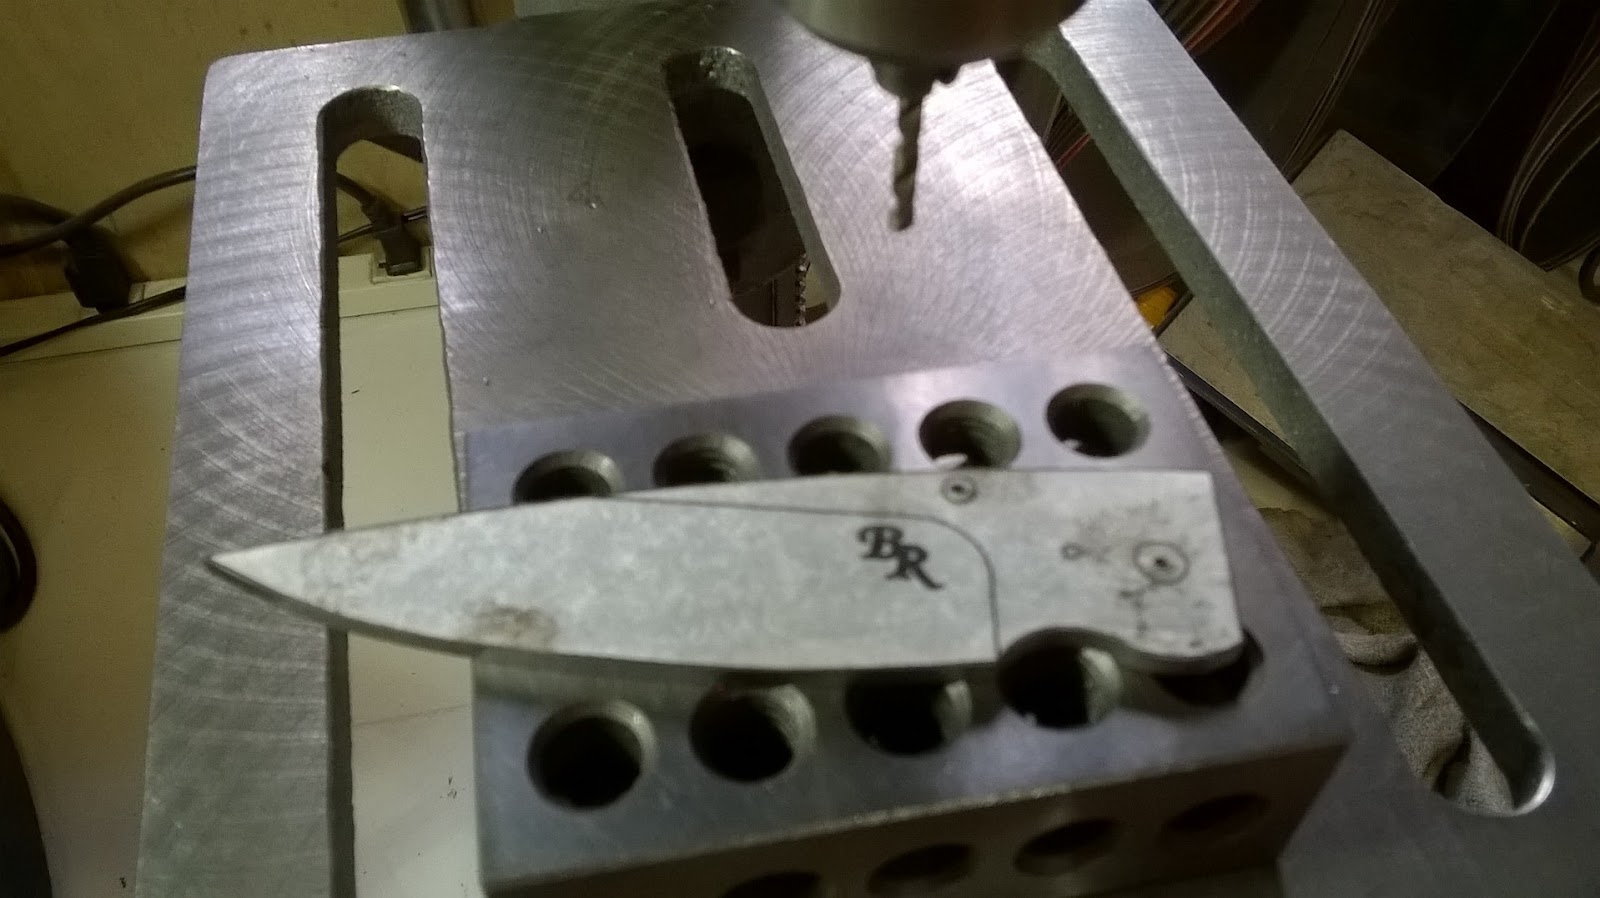
I decided to mix up my build order a little bit and start with the blade.  Since I'm not planning on doing any spine file work on the blade, I think I can get away with it.  The above photo shows the blade after it has been profile ground.  I'm drilling out the holes for the pivot and the thumb stud before heat treating the blade.

All wrapped up in foil and ready for heat treatment.

Into the oven she goes.

While the blade is heat treating, I'll get started on the handle.  Here you can see some 416 stainless for the bolsters and spacer and a sheet of titanium for the liners.  I was going to use this buckeye burl for the scales but I changed my mind a little later and went with some burgundy-colored Micarta.

Here are the parts after rough cutting on the band saw.  You can see the Micarta there at the top.

The liners have been temporarily glued together with the pattern on top.  The liners get profiled at the same time so that they are identical twins.

After drilling all the holes in the liners, It's time to begin fitting the bolsters and scales.  The bottom liner in the photo has the front bolster clamped to the liner.  I will drill through the liners into the bolsters to get the screw holes aligned.

After the holes have been drilled through the bolsters, they get pinned together in order to get the rear end of them ground even.  The next photo shows what I mean.

The face of the bolsters that will mate with the scales around ground down to match one another.  The photo shows them still pinned together.

Now that the bolsters match, the back side of each gets ground down at 30 degrees to create dovetails.

This shows the complete dovetails.

Here's a little tip when working with dark-colored scale material.  Put some masking tape over the scale and trace the pattern onto the tape.  Easy to see and the tape peels right off without any trouble.

After a short trip to the band saw, here are the scales ready to be fitted to the front bolsters.  They are cut slightly large so that there is extra material to help with fitting.

Dovetails have been ground into the front of the scales to mate up with the bolsters.  The photo shows how they dovetail together.

The scales get clamped in place and holes drilled in the same manner as the front bolsters.

The back end of the scales get ground to match each other and ground at an angle to start the dovetails with the rear bolsters.  The rear bolsters get dovetailed, clamped to the liners, and holes drilled just like the other parts.

You may have to get out your magnifying glass, but if you look very closely at the bottom corner of this liner, you will see a little black dot.  That's what it looks like when you break off a tap in a hole when trying to cut threads into titanium.  This doesn't happen to me very often anymore, but I used to just scrap the liner because that little piece was impossible to get out.  I recently heard of a trick used by other knife makers when this happens to them.

Here's the trick.  Acid!  Titanium is stable and unaffected by acid, but the carbon steel tap isn't.  This is the first time I've tried this trick, so my fingers were crossed when I dipped it into some ferric chloride.

It worked!  After leaving the liner in the acid over night, the acid has eaten away the steel and left the titanium unscathed.  I'll for sure have to remember this trick.

Here are all the handle parts assembled.  Looks kind of "chunky" and uneven, but we'll take care of that right now.

After a few minutes on the grinder, all the parts are ground down to match the liners.  Building my scales and bolsters this way, the handles are perfect mirror images of each other.  There's nothing worse than dovetails that are a little bit off from each other.

I assembled the handle together and rounded over each side.  I really like how this handle looks, and it feels very comfortable in the hand.

Confession time.  While grinding the first blade, I made a fatal mistake and had to scrap the blade completely.  It doesn't happen very often, but after throwing a little tantrum like a 2-year-old, I built a new blade and through the old one into the drawer of shame.  Here is blade #2 after getting hollow ground.  Looks much better now.  Once I get the blade fit to the handle, I'll work on the blade finish.  I don't want to get everything polished up at this point as inevitably it will get scratched and I'll have to start over.

Here is what the knife looked like when I knocked off on Saturday afternoon.  The open position for the blade has been dialed in and the blade has been ground to the handle for a seamless fit.  This is going to be a nice knife!  I'm toying with the idea of going with a full mirror polish on the bolsters and the blade, but I haven't decided for sure.  I like the looks of this knife enough that I might also leave the knife without any file work to embellish it.  I'll toy with these two ideas throughout the week before I get back to the shop.  Either way, this knife is sure to be a winner.

Thanks for tagging along with me on this new build.  I hope you are enjoying your time spent here on the Robinson Edge.

-  Brandant Robinson