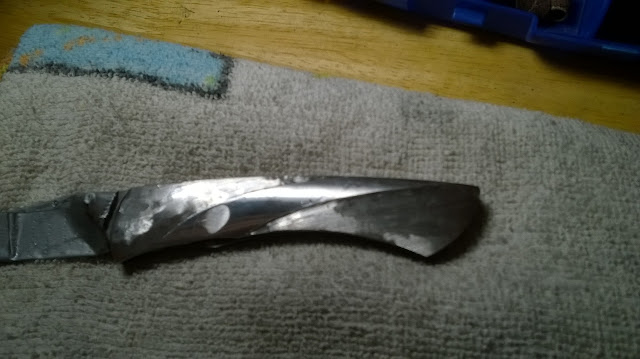
This is where we left of from last time. The contour lines have been cut in by first using a diamond wheel in a rotary tool and finished off by hand filing.
After sitting on things and studying the knife for the last week, I made the determination that I was varying too far off my original intent of keeping this knife clean and simple. After come to this conclusion, I made the determination to remove the intersecting lines and keep only a single curve through the center of the knife. I have indicated the areas that will be removed in the above photo with a black marker.
Using a 1/2" sanding drum in my Dremel, I cut into the steel at the previously determined line. At first, I am only trying to establish the depth of the cut at the curved line. This process effectively "lifts" the curve off of the surface of the scale.
Here is what the handle looks like after making that initial pass. I was actually quite surprised at how fast the steel was removed using this technique.
Next, using my diamond cut off wheel, I reestablish the curved line and smooth things back out.
This photo shows the progress after the lines have been smoothed out.
After spending some time with the 1/2" drum, I lower the entire surface of the section and even things out a little.
Now that the curve is raised and established, I can add some texture to the lowered areas. I debated a bit on how to accomplish this. I chose to make tiny cuts with the diamond wheel over stippling with a flame tip bit. Stippling with a flame tip gives small, round dots, and the diamond wheel gives tiny little lines. The reason for using the diamond wheel was to be able to orient the little cut lines with the curve to not only add texture, but to also continue the flowing look of the curve through the texture. I think it really adds a lot to this piece.
The above photo shows the front area after it receives some texturing. I also repeat the whole process for the right scale to complete the carving and texturing work. At this point, the knife is practically done. The only thing left to do now is to clean it up a bit and give it some hand-rubbed attention.
And here she is in all her glory! Everything is finished up to 600 grit and hand rubbed until things flow together. You might also notice that I smoothed out the indentation for the thumb stud ramp. This little divot helps guide one's thumb to make opening the knife really comfortable. The blade also got its edge put on. Because of the thin edge geometry, sharpening went really fast. I had fun making fine ribbons of cardstock paper as I checked the edge for any flaws. Man, I tell you, it's sharp and seems to hold a great edge.
This is a look at the bottom of the knife. Again, not much to see except to show a nice, early lockup.
This final pic shows the back side of the knife in the closed position. You can just see the thumb stud screw head, which is the only visible hardware on this knife. I've peen thumb studs into blades before for a seamless fit. If I had to do it over again, I think I would have taken the time to do it with this one as well. I'll make a mental note for the future if I decide to make another knife in this manner.
I have to say, I truly enjoyed this build, even more so that most. It was a fun experiment into the unknown and I chalk this one up in the "win" category. I think it turned out really nice. It would say it has some simple elegance to it. I will be posting it to my available knives page soon, so check back if you are interested in adding it to your collection.
As always, thanks for following along with me on this knife-making adventure. Now, back to my design notebook to decide on what to build next!
- Brandant Robinson


No comments:
Post a Comment