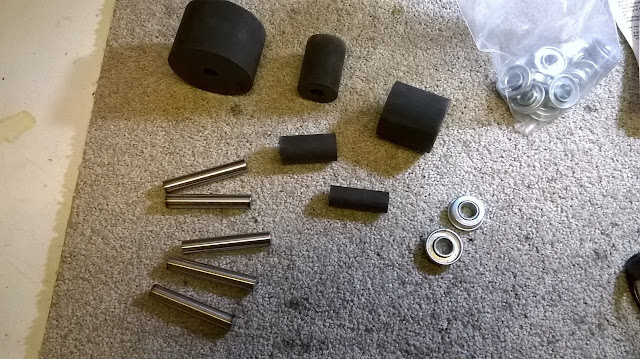
The above photo shows the raw materials that will be used to make the interchangeable wheels. I actually ordered these components off the internet several months ago, but just didn't find the time until now to get started. The black rubber cylinders are replacements for the same kind of spindle sander that I'm trying to replace. The plastic bag is full of 1/2" inside diameter flanged bearings. And at the bottom of the pic you can see a 1/2" O1 steel rod that I've had lying around the shop for years that will be used for the axles.
The rubber cylinders are about 4-1/2" long which is twice as long as I need them to be. I cut them into 2" lengths on the band saw and flatten off the cut end on the disk sander. I also cut the O1 rod into 3" long pieces which will act as the axles of the wheels.
In order to keep the wheels from rotating around on the axles I applied some contact cement to the axles and the inside surfaces of the wheels and push the axles into place. As an added measure of precaution, I ran a bead of super glue around the edges of the axles where they contact the wheels to make sure there is no slippage.
Once the glue was set, I attached the bearings to the axles by staking them in place with a center punch. It's a simple matter of standing the axles up on end and pounding on the lip of the axles with a hammer and center punch to expand the axle edge tightly against the bearing. The above photo shows all six of the completed wheels ready for action. I now have 1/2", 3/4", 1", 1-1/2", 2", and 3" wheels which will give me a good selection of diameters to choose from. Unfortunately I didn't have any materials needed to make the actual tool arm that will accept these wheels, so I had to put the project on hold while I find some suitable materials. So, in the mean time, I started a new knife. I'm pretty excited about the prospects of this one, so here goes.
As there is really no new techniques that I will be trying on this knife, just new materials and assorted finishes, I didn't bother taking any step-by-step pics. The above photo shows the liners with the scales already attached. I put some black spacer material on the backs and on the dovetails of the scales to add a little more drama. the copper that I had was about three times as thick as I needed it to be, so I ground down the bolsters blanks to about 1/8" thick. I forgot how fast copper heats up and have a couple of sore thumbs where they singed my skin. Occupational hazard I guess.
The last thing that I was able to accomplished was to finish heat treating the blade. Here's the blade after hardening, quenching, cryo treating, and two temper cycles. I'm thinking about going with an etched finish on this blade. I think that kind of finish will look awesome with the copper and red burl. I've never done a full etch on a blade, except for Damascus, so this should be a fun experiment.
More to come next week. Thanks for stopping by the Robinson Edge.
- Brandant Robinson


No comments:
Post a Comment